
Tinsel CRM – Mockup Tool v2 (User Guide)
1. Getting Started — Opening the Mockup Tool
Before you can start designing a mockup, you need to upload a photo of the property to your project.
Steps:
1. Navigate to the Project page for the client you want to create a mockup for.
2. Under the Files section, make sure the property photo is already uploaded. If not, click Upload to add an image first.
3. Click the three dots (⋯) next to the file you want to mock up.
4. Click + New Mockup.
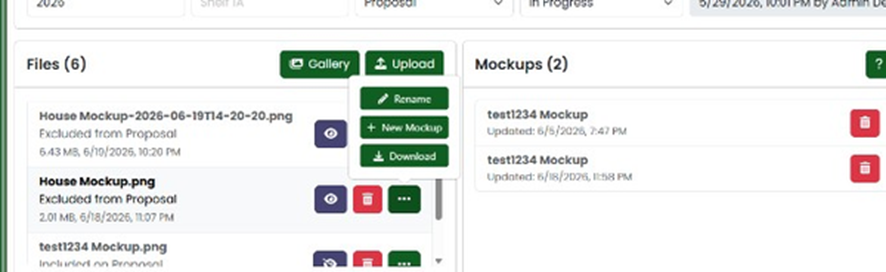
Project page — Files section with the ‘+ New Mockup’ button
5. The Mockup Editor will open with your selected image loaded on the canvas.
NOTE: You can also view existing mockups in the Mockups section of the project page.
2. Interface Overview
The Mockup Tool interface has four main areas:
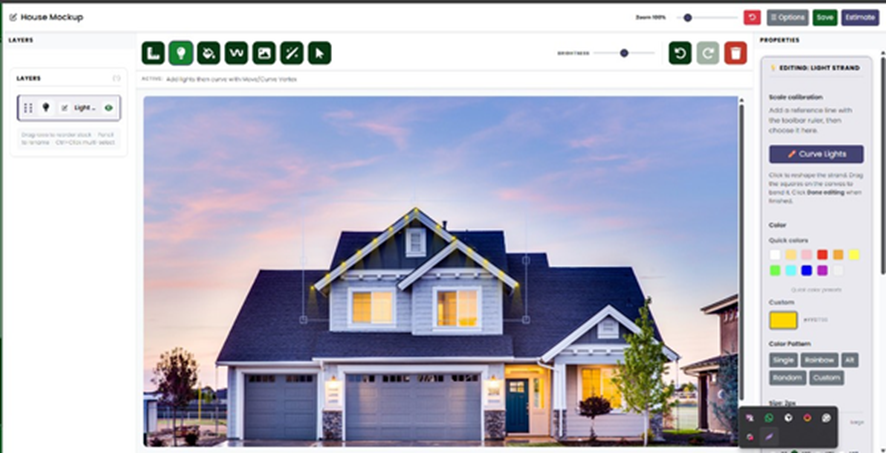
Mockup Tool — Full editor interface
2.1 Toolbar
The toolbar is located at the top center of the editor. It contains all the drawing and editing tools.

Main toolbar icons
From left to right, the toolbar icons are:
- Scale Reference Tool – Draw a reference line on the photo and set its real-world length (e.g., door width or roofline) to calibrate scale for accurate spacing and estimates.
- Light Strand Tool — Add strands of lights along edges and surfaces
- Bush Fill Tool — Fill a geometric area with lights. Useful for bushes and trees.
- Garland Tool — Draw garland with optional lights
- Custom Image Tool — Add custom images (wreaths, bows, logos, etc.)
- Toggle twinkling light animation Tool — Turn the twinkling light animation on or off to preview how the lights will look when animated.
- Select / Move Tool — Select and reposition objects on the canvas
2.2 Layers Panel
The Layers panel is on the left side of the editor. Each decoration you add creates a new layer.
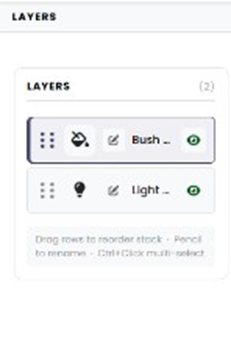
Layers panel showing multiple layers
Layer features:
- Drag to reorder/ Grip dots — Change the stacking order of layers by dragging
- Pencil icon — Click to rename the layer
- Eye icon — Toggle layer visibility on/off
Note: Use Ctrl+Click to multi-select layers for batch operations.
2.3 Properties Panel
The Properties panel is on the right side. It shows settings for the currently selected layer or tool. The options change depending on which tool or layer you are editing.
Common property sections include:
- Scale Calibration — Set or choose a reference for accurate measurements
- Color — Quick color presets and custom color picker
- Color Pattern — Single, Rainbow, Alt, Random, or Custom patterns
- Size / Spacing — Adjust bulb size, quantity, spacing, etc.
3. Scale Calibration (Reference Length)
Scale calibration lets you set a real-world measurement reference on your photo. This helps Tinsel calculate accurate estimates for materials needed.
How to Set a Reference:
1. In the Properties panel, look for Scale Calibration.
2. Click Add a reference line using the toolbar ruler, or select an existing reference from the dropdown.
3. Draw a line on the canvas along a known measurement (e.g., the width of a garage door).
4. The Set Reference Length dialog will appear.
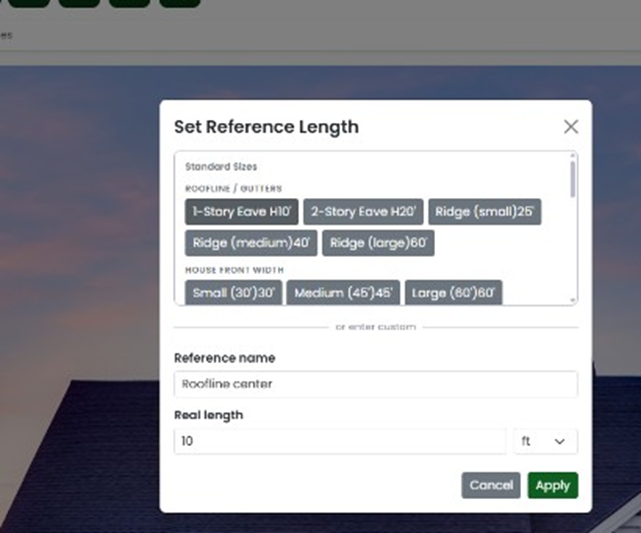
Set Reference Length dialog with standard size presets
Standard Size Presets:
Roofline / Gutters:
- 1-Story Eave H: 10 ft
- 2-Story Eave H: 20 ft
- Ridge (small): 25 ft
- Ridge (medium): 40 ft
- Ridge (large): 60 ft
House Front Width:
- Small (30 ft)
- Medium (45 ft)
- Large (60 ft)
5. You can also enter a custom reference name and real length (in feet or meters).
6. Click Apply to save the reference.
Note: Once a reference is set, you can lock it from the Properties panel so it won’t accidentally be moved or resized.
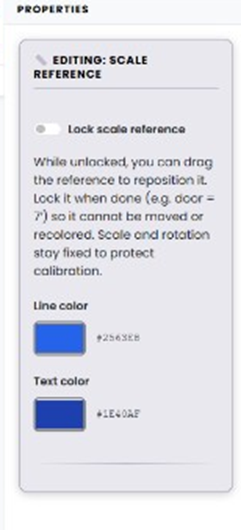
Scale Reference properties — lock, line color, text color
4. Light Strand Tool
The Light Strand tool lets you add strands of holiday lights along rooflines, eaves, windows, and other surfaces.
How to Add Lights:
1. Click the Light Strand icon (light bulb) in the toolbar.
2. Click on the canvas to place your first point where you want the lights to begin.
3. Click additional points to extend the strand along the desired path.
4. The lights will appear along the path. Click Done editing when finished.
Editing Light Strand Properties:
When a Light Strand layer is selected, the Properties panel shows these options:
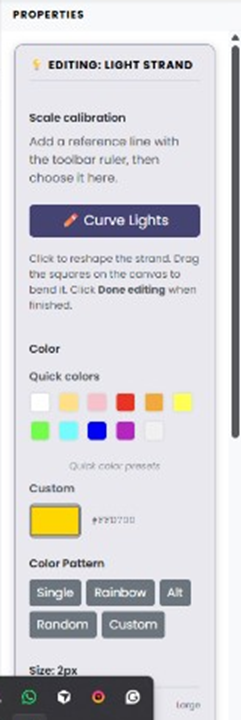
Light Strand properties panel
Curve Lights
Reference: Select a light strand on the canvas → Properties panel (right side) → ✏️ Curve Lights button
Click this button to reshape the strand. Drag the square handles on the canvas to bend the strand into curves. Click Done editing when finished.
Reshaping the Strand
• Drag a square handle — bend the strand at that point
• Click the wire — add a new bend point
• Tap a square handle — switch between smooth curve and sharp corner
• Double-tap a handle — remove that bend point
Finishing Up
• Click Done editing to save changes and exit curve mode
• You can re-enter curve mode anytime by selecting the strand and clicking ✏️ Curve Lights again
Color
- Quick Colors — Click any preset color swatch to apply it instantly
- Custom — Enter a hex code or use the color picker for an exact color
Color Pattern
- Single — All bulbs use one color
- Rainbow — Automatically cycles through rainbow colors
- Alt — Alternates between two colors
- Random — Each bulb gets a random color
- Custom — Define your own pattern sequence
Size
Use the slider to adjust the bulb size (measured in pixels).
5. Bush Fill Tool
The Bush Fill tool lets you add decorative lights to bushes, hedges, and other landscaping elements by filling an area.
How to Use:
1. Click the Bush Fill icon (bush/tree) in the toolbar.
2. Click on the canvas to outline the area you want to fill with lights.
3. The area will be filled with light points automatically.
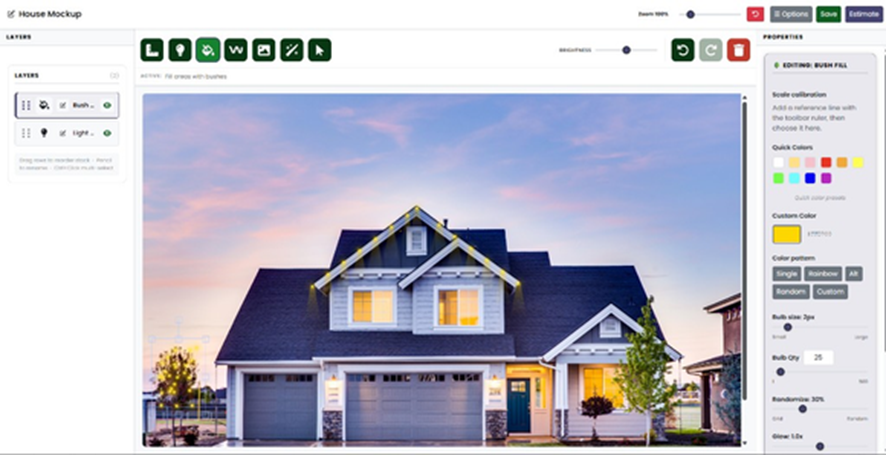
Bush Fill tool active with properties panel
Bush Fill Properties:
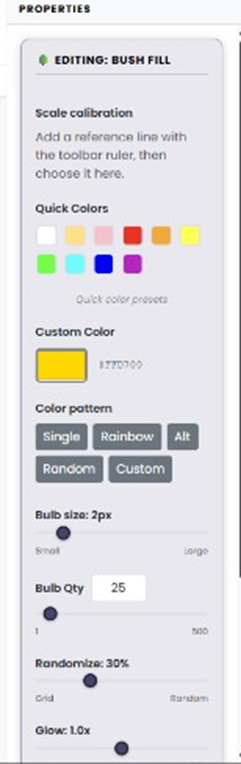
Bush Fill properties panel
Quick Colors & Custom Color
Same color options as the Light Strand tool — pick from presets or enter a custom hex color.
Color Pattern
Choose from Single, Rainbow, Alt, Random, or Custom patterns.
Bulb Size
Adjust the size of each light point using the slider (measured in pixels).
Bulb Qty (Quantity)
Control how many bulbs appear in the filled area. Use the slider or type a specific number.
Randomize
Adjusts how randomly the bulbs are placed within the area. Slide toward “Grid” for even spacing, or toward “Random” for a more natural, scattered look.
Glow
Controls the glow intensity around each bulb. Higher values create a brighter, more radiant effect.
6. Garland Tool
The Garland tool lets you draw decorative garland (greenery) along surfaces, with an option to add lights on top.
How to Add Garland:
1. Click the Garland icon (wavy line) in the toolbar.
2. Click points on the canvas to draw the garland path.
3. The garland will appear with greenery along the path.
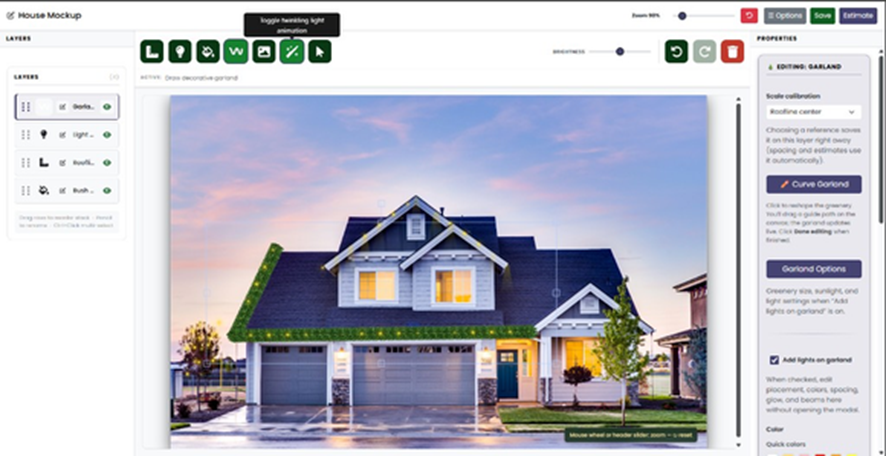
Garland tool active — showing garland with lights on a house
Garland Properties:
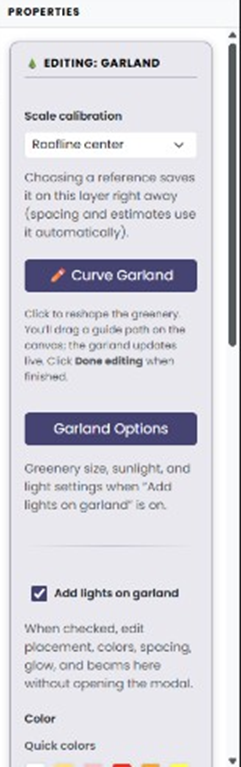
Garland properties panel
Curve Garland
Reference: Select a garland on the canvas → Properties panel (right side) → ✏️ Curve Garland button
Click this button to reshape the garland greenery. A guide path appears on the canvas — drag it to bend the garland. The greenery and lights update live. Click Done editing when finished.
Reshaping the Garland
• Drag a square handle — bend the garland at that point
• Click the guide path — add a new bend point
• Tap a square handle — switch between smooth curve and sharp corner
• Double-tap a handle — remove that bend point
Finishing Up
• Click Done editing to save changes and exit curve mode
• You can re-enter curve mode anytime by selecting the garland and clicking ✏️ Curve Garland again
Garland Options
Opens the Garland Options dialog with advanced settings:
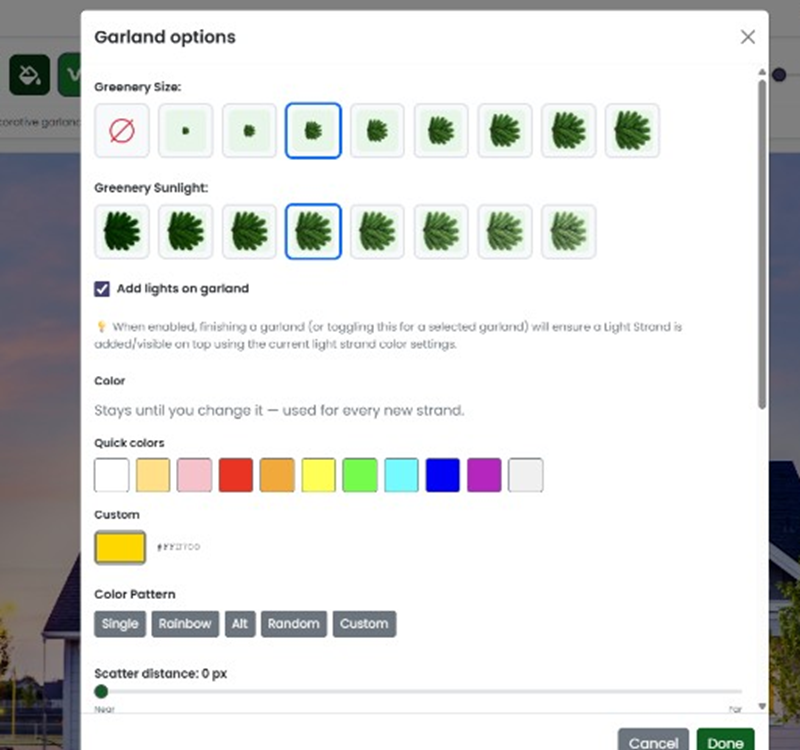
Garland Options dialog
- Greenery Size — Choose from multiple sizes, from no greenery to large leafy garland
- Greenery Sunlight — Adjust the sunlight/shadow tone of the greenery to match the photo’s lighting
- Add Lights on Garland — When checked, a Light Strand is automatically added on top of the garland using the current light strand color settings
- Color — Set the light color using Quick Colors or a Custom hex color
- Color Pattern — Single, Rainbow, Alt, Random, or Custom
- Scatter Distance — How far apart the lights are spread across the garland.
Add Lights on Garland (checkbox in Properties panel)
When checked, you can edit the light placement, colors, spacing, glow, and beams directly from the Properties panel without opening the Garland Options dialog.
7. Custom Image Tool
The Custom Image tool lets you add pre-made images like wreaths, bows, logos, or any custom graphics to your mockup.
How to Add a Custom Image:
1. Click the Custom Image icon (picture frame) in the toolbar.
2. Browse or upload the image you want to add.
3. The image will be placed on the canvas. Click and drag to position it.
4. Use the handles to resize or rotate the image as needed.
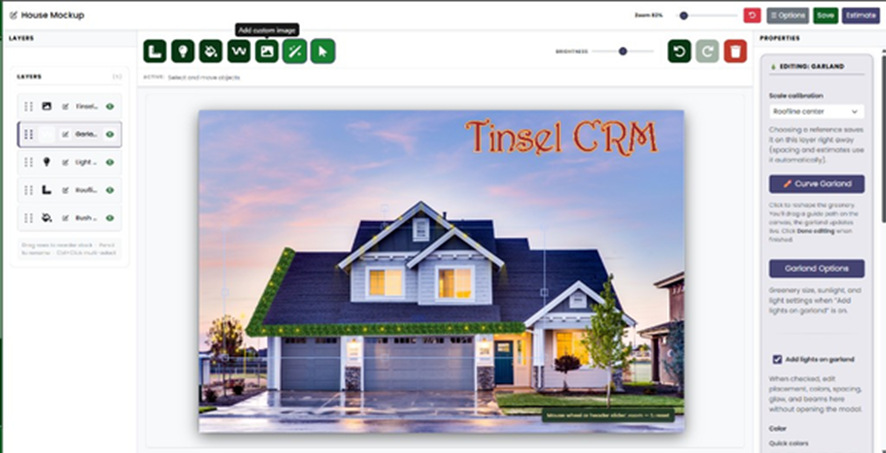
Custom image added to mockup (e.g., company branding)
Note: Custom images are great for adding your company logo or branding to mockup presentations.
8. Select & Move Tool
The Select & Move tool (pointer icon) lets you select, reposition, and manage objects on the canvas.

How to Use:
1. Click the Select / Move icon (arrow pointer) in the toolbar.
2. Click on any object on the canvas to select it.
3. Drag the selected object to reposition it.
The active status bar will show: “Select and move objects”
Note: You can also click a layer in the Layers panel to select the corresponding object on the canvas.
9. Twinkling Light Animation
The twinkling animation lets you preview how your lights will look with a realistic blinking effect , great for showing clients an animated preview.
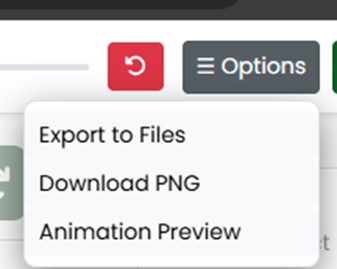
Twinkling Light Animation toggle button or Animation Preview under Options button
Toggle twinkling on the canvas
How to Use:
- In the toolbar, look for the sparkles/wand icon (tooltip: Toggle twinkling light animation). It sits in the toolbar alongside the other drawing tools.
- Click the button to turn the twinkling animation on.
- The lights on the canvas will begin to twinkle, simulating a realistic holiday light effect. When the animation is active, the button shows a purple highlight.
- Click the button again to turn off the animation and return to the static view.
Preview and export for clients
How to Use:
- Click ☰ Options in the top-right of the editor.
- Select Animation Preview.
- A preview modal opens with a live twinkling effect. Click Download GIF to generate a file you can share with clients.
- To turn off the animation afterward, use the sparkles/wand icon in the toolbar.
Note: Use the twinkling animation during client presentations to give them a realistic feel of how the lights will look at night. Combine it with reduced brightness for the best effect.
10. Brightness Control
The Brightness slider lets you darken the background photo to make the lights stand out more — simulating a nighttime look.

Brightness slider in the toolbar
How to Use:
- Drag the slider to the left to darken the image (nighttime effect)
- Drag the slider to the right to brighten it back to the original
- The slider is located in the top toolbar area, labeled “BRIGHTNESS”
Note: Reducing brightness makes holiday lights and glow effects look much more realistic and impressive for client presentations.
11. Undo, Redo & Delete
Quick action buttons are located in the top-right area of the toolbar.
Undo, Redo, and Delete buttons
- Undo (↩) — Reverses the last action
- Redo (↪) — Re-applies an undone action
- Delete (🗑 red) — Deletes the currently selected layer or object
NOTE: Undo/Redo works for all actions including drawing, moving, color changes, and property edits.
12. Zoom Controls
Zoom controls are located in the header bar at the top of the editor.

Zoom control in the header
- Mouse wheel — Scroll up to zoom in, scroll down to zoom out
- Zoom slider — Drag the slider in the header to adjust zoom level
- Reset — Press the reset shortcut (shown in the status bar) to reset zoom to default
The current zoom percentage is displayed next to the slider (e.g., “Zoom 100%”).
13. Saving Your Mockup
Always save your work to avoid losing changes.
Header buttons — Options, Save, Estimate
How to Save:
1. Click the green Save button in the top-right corner of the editor.
2. Your mockup will be saved and linked to the project.
Options Button:
Click Options for additional settings like exporting, renaming, or other mockup management features.
Note: Save frequently! Especially after completing a major section of your mockup design.
14. Creating an Estimate
Once your mockup is complete, you can generate a materials estimate directly from the editor.
How to Create an Estimate:
1. Make sure you have set a Scale Calibration reference (see Section 3).
2. Click the purple Estimate button in the top-right corner.
3. Tinsel will calculate the estimated materials needed based on your mockup measurements.
NOTE: The Estimate feature uses your scale reference to calculate real-world measurements. For the most accurate results, make sure your reference line is calibrated correctly.
0 Comments