Importing Clients And Contacts
If you are joining Tinsel from an existing CRM system, chances are you already have a pre-built database of clients. Tinsel allows you to import these clients, given that you upload a .CSV file with the following column headers:
- Column A (“Name”)
- Column B (“Street”)
- Column C (“City”)
- Column D (“County”)
- Column E (“State”)
- Column F (“Postal Code”)
- Column G (“Type”)
- RESIDENTIAL, COMMERCIAL, or OTHER
- Column H (“Lead Type”)
- Social Media, Referral, etc.
- Column I (“Status”)
- PROSPECT, WAIT LIST, CUSTOMER, or INACTIVE
In order for clients to be associated with existing contacts, the following columns need to be structured as follows:
- Column J (“Contact 1 First Name”)
- Column K (“Contact 1 Last Name”)
- Column L (“Contact 1 Phone”)
- Column M (“Contact 1 Phone Extension”)
- Column N (“Contact 1 Email”)
This pattern will repeat for the number of contacts you have for each client. Be sure to change “Contact 1” to correspond with the contact number you are entering.
When you are certain that you have a CSV file that is formatted this exact way, you are ready to import your clients!
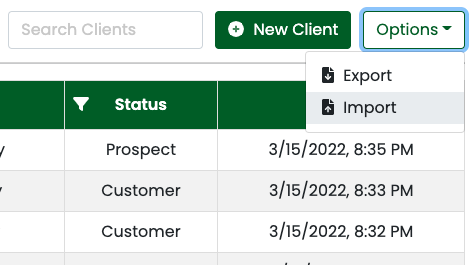
Open the clients page. Once you are on the clients page, click options in the top right corner. Then, click import.


2 Comments
Is there a way to mass import contacts so they automatically associate with their respective clients? I don’t want to manually input each contact.
Hi Danil!
You can add the contacts to the same CSV file that you upload the clients with!
In order for clients to be associated with existing contacts, the following columns need to be structured as follows:
Column J (“Contact 1 First Name”)
Column K (“Contact 1 Last Name”)
Column L (“Contact 1 Phone”)
Column M (“Contact 1 Phone Extension”)
Column N (“Contact 1 Email”)
This pattern will repeat for the number of contacts you have for each client. Be sure to change “Contact 1” to correspond with the contact number you are entering.
– Zack